

If you use Google Ads Lead Form assets, you know how frustrating it is:
you have to manually log in every day to download a CSV file. Meanwhile, your leads are waiting… and cooling down.
Today, thanks to Laure’s idea and code written with the help of Gemini, we’re offering a 100% free, scalable solution: a single script capable of managing all your forms, which instantly sends your leads to Google Sheets and alerts you by email.
Step 1: Get the Google Sheets Template
Click the link below to create a private copy of the dashboard in your own Google Drive.
👉 CLICK HERE TO COPY THE TEMPLATE
This document appears empty, but it contains the necessary script under the hood.
Step 2: Configure Email Notifications
Once your copy is open, we simply need to tell the script where to send notifications.
-
Go to Extensions > Apps Script.
-
In the editor that opens, edit line 8:
replace[email protected]with your own email address. -
Click the Save (disk icon).
Step 3: Deploy & Authorize
This step generates the bridge between Google and your Sheet.
-
Click the blue Deploy button (top right) > New deployment.
-
Click the gear icon ⚙️ and select Web App.
-
Crucial Settings:
-
Execute as: Me
-
Who has access: Anyone (Required for Google Ads to connect)
-
-
Click Deploy.
-
Authorize the script: Google will ask for permission. Click “Review Permissions” > Choose account > “Advanced” > “Go to (unsafe)” > Allow.
-
Copy the Web App URL that appears.
Step 4: Connect Google Ads
Now it’s time to link everything to your campaigns:
-
Open your Lead Form asset in Google Ads.
-
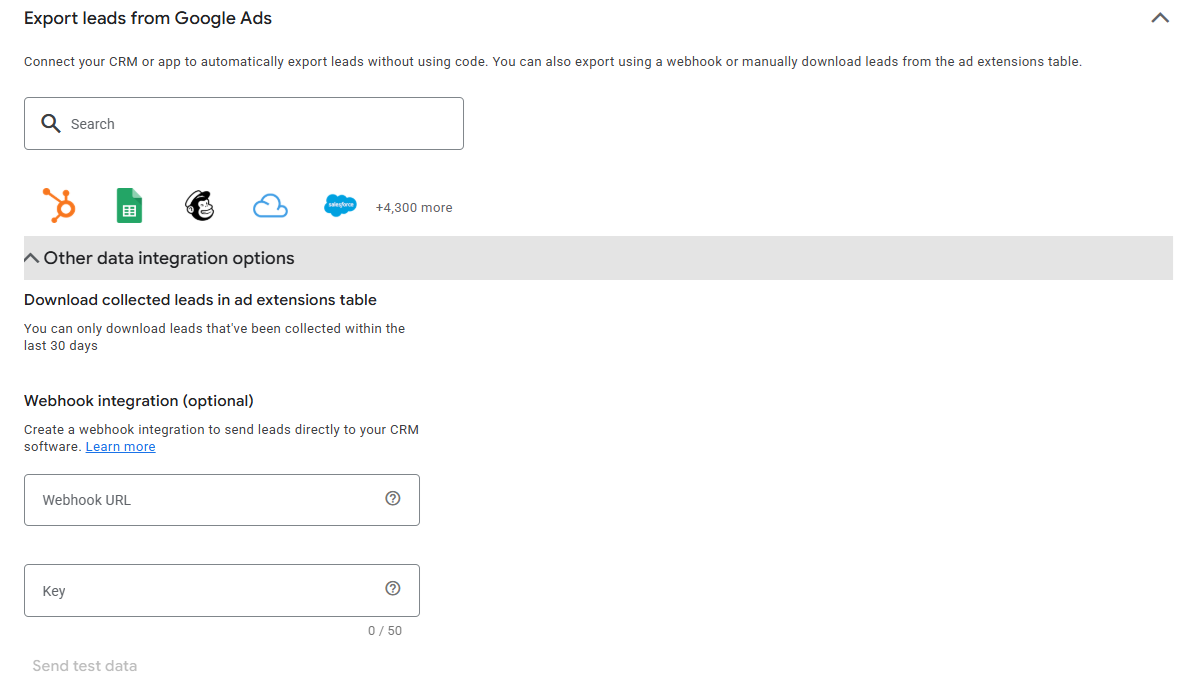
Scroll down to the “Export leads from Google Ads” section.

-
Select Webhook.
-
Paste the URL you just copied.
-
In the “Key” field: Type the name of your form (e.g., “Pool Quote”).
-
This name will appear in your email alerts and your Sheet!
-
-
Click Send test data.
The Result
If you go back to your Google Sheet, you’ll see a test row appear instantly.
You’ll also receive a structured email with the lead’s details and a button to call them directly.
If the test works, don’t forget to Save your changes in Google Ads!
Why Use This Method?
-
Speed: Call your leads back in under 2 minutes.
-
Free: No Zapier, Make, or third-party licenses required.
-
Clean: All data is centralized, including the GCLID for offline conversion tracking.
-
One Webhook for your entire account: You can use the exact same URL for 1, 5, or 50 different forms. The script uses the Google Ads “Key” field to automatically identify where the lead came from.
-
Auto-Adaptive Columns: If your first form asks for “Email” and your second form asks for “Pool Size,” the script will automatically create the new column in your Google Sheet without you lifting a finger.
-
Zero Maintenance: Did you add a question to your form? The script will adapt automatically to the next incoming lead.
💡 Pro Tip: If you modify the code later (e.g., to change the email recipient), do not create a new deployment. Instead, go to Deploy > Manage deployments, click the pencil icon ✏️, select “New Version” from the dropdown, and click Deploy. The URL will stay the same, so you won’t need to touch anything in Google Ads!
🔒 Option: Secure the Script (Advanced)
By default, your Webhook URL acts as your “password” (it is impossible to guess). However, if you want maximum security:
-
In the script (line 15), add a secret code:
var EXPECTED_SECRET = "MySecretPassword"; -
In Google Ads (Step 4), the Key format changes. You must type:
Form Name|MySecretPassword. (The|symbol acts as a separator. If the password doesn’t match, the lead is blocked).
For those who want to inspect the code or customize it (e.g., to send data directly to a CRM), here is the full script: